Update as of 08:47 GMT, July 5, 2023
A decline in VPN access and connectivity are affecting some users in Russia. For those having issues connecting to the VPN, please update to the latest version of ExpressVPN and follow the rest of the troubleshooting steps.
In the meantime, please bookmark and return to this page for the latest advice and updates.
Jump to section
Can’t activate or sign in to ExpressVPN in Russia
Can’t connect to ExpressVPN in Russia
Can’t activate or sign in to ExpressVPN in Russia
1. Try connecting to a different network
Temporarily switching to another Wi-Fi network or internet service provider, if available, may allow you to complete activation or sign-in.
2. Change your DNS servers
Changing your DNS servers may also help resolve this issue. If you do not know which DNS servers to use, we recommend OpenDNS. These servers are safe and available to the public.
Follow the steps for your device to change your DNS servers to OpenDNS’ servers.
Note: Write down your current DNS address/setting before changing it for future reference and safekeeping.
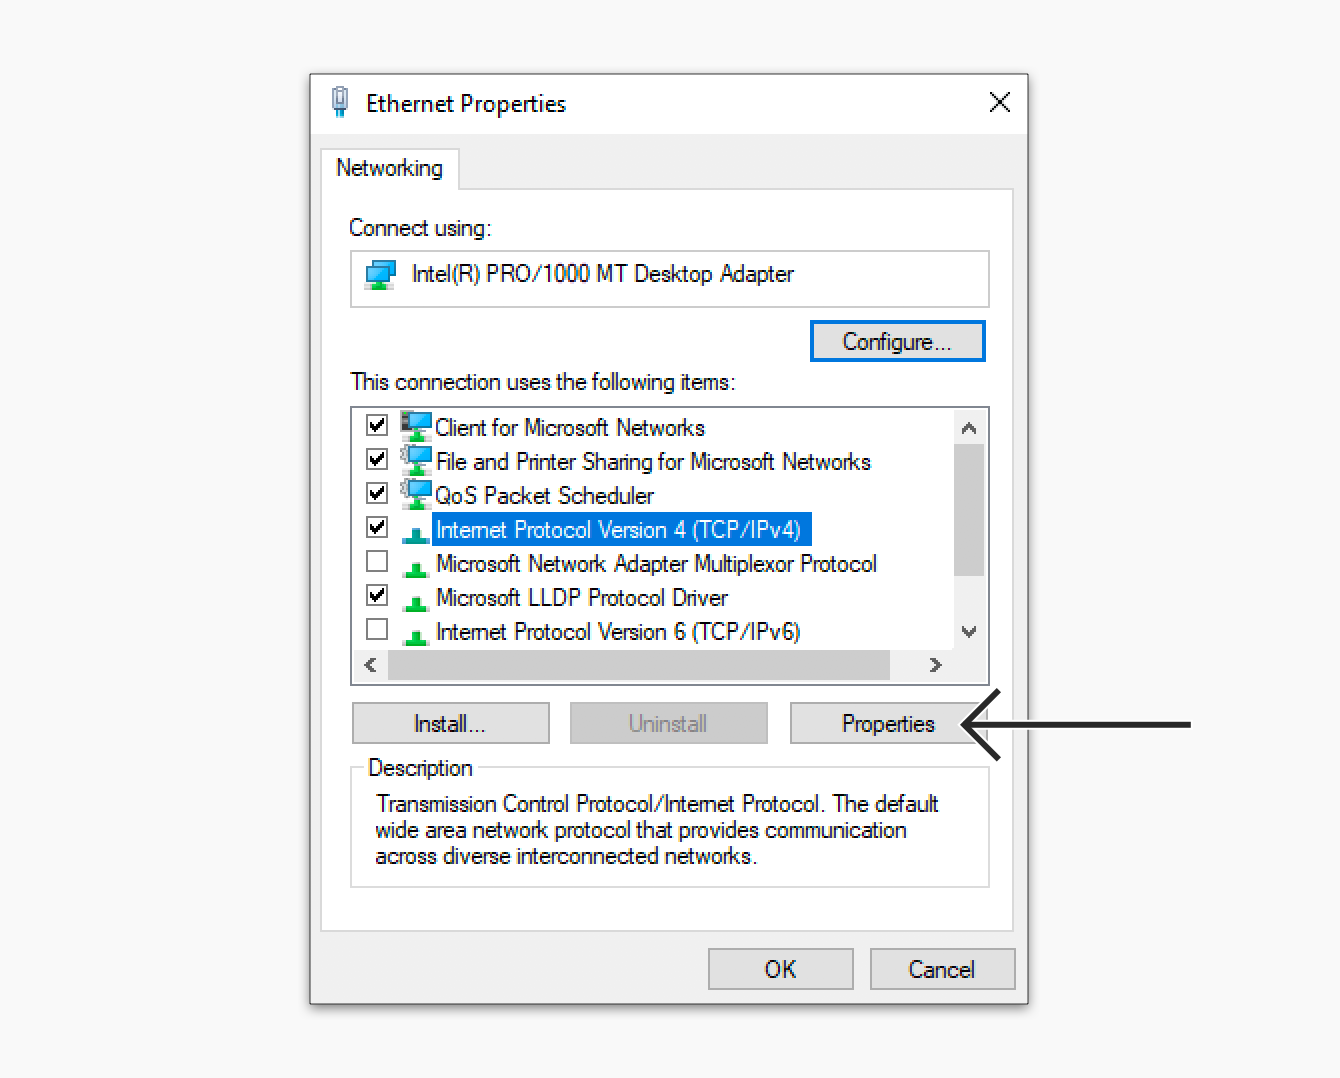
- Go to Control Panel > Network and Internet > Network and Sharing Center > Change Adapter Settings.
- Right-click on the active network connection and click Properties.
- In the Networking tab, select Internet Protocol Version 4 (TCP/IPv4) and click Properties.


- Select Use the following DNS server addresses.
- Enter 208.67.222.222 and 208.67.220.220. These are OpenDNS’ DNS servers.
- Click OK and OK.
- Try activating your ExpressVPN app again.
You can revert the changes made to your DNS settings to use your local DNS servers after you have successfully activated your ExpressVPN app.
Need help? Contact the ExpressVPN Support Team for immediate assistance.
You can change your DNS server with these steps:
- Click

 . Select System Preferences > Network.
 - Select the connection for which you want to change your DNS server settings. Click Advanced…
- Select the DNS tab. Click
 to enter 208.67.222.222 and 208.67.220.220. These are OpenDNS’ DNS servers.
 - Click OK > Apply.
- Try activating your ExpressVPN app again.
You can revert the changes made to your DNS settings to use your local DNS servers after you have successfully activated your ExpressVPN app.
Need help? Contact the ExpressVPN Support Team for immediate assistance.
You can change your DNS server with these steps:
- Go to Settings > Preferences > Network Connections.
- Select the connection for which you want to change your DNS server settings.
- Click Edit. Select IPv4 Settings.
- Select Automatic (DHCP) addresses only.
- In the DNS servers field, enter 208.67.222.222 and 208.67.220.220. These are OpenDNS’ DNS servers.
- Click Apply.
- Try activating your ExpressVPN app again.
You can revert the changes made to your DNS settings to use your local DNS servers after you have successfully activated your ExpressVPN app.
Need help? Contact the ExpressVPN Support Team for immediate assistance.
Every Android device uses a different user interface in its settings. You can change your DNS server settings with these generic steps below:
- Go to Settings > Network & internet.
- Tap Wi-Fi > Your current network.
- Tap your current network again. Then, tap
 in the top-right corner.
 - Select Advanced options.
- Change IP settings to static.
- In DNS 1 and DNS 2 fields, enter 208.67.222.222 and 208.67.220.220. These are OpenDNS’ DNS servers.
- Tap Save.
- Try activating your ExpressVPN app again.
You can revert the changes made to your DNS settings to use your local DNS servers after you have successfully activated your ExpressVPN app.
Need help? Contact the ExpressVPN Support Team for immediate assistance.
You can change your DNS server with these steps:
- Go to Settings.
- Tap Wi-Fi > Your current network.
- Under DNS, change Automatic to Manual.
- Remove existing DNS servers.
- Tap Add Server. Enter 208.67.222.222 and 208.67.220.220. These are OpenDNS’s DNS servers.
- Tap Save.
- Try activating your ExpressVPN app again.
You can revert the changes made to your DNS settings to use your local DNS servers after you have successfully activated your ExpressVPN app.
Need help? Contact the ExpressVPN Support Team for immediate assistance.
Every router admin panel has a different user interface. You can change your primary router’s DNS server settings with these generic steps below:
- Find your router’s IP address. Then, type it in your browser.
- Log in to your router admin panel.
- Go to your DNS server settings. Enter 208.67.222.222 and 208.67.220.220. These are OpenDNS’ DNS servers.
- Tap Save.
- Try activating your ExpressVPN app again.
You can revert the changes made to your DNS settings to use your local DNS servers after you have successfully activated your ExpressVPN app.
Need help? Contact the ExpressVPN Support Team for immediate assistance.
3. Contact the ExpressVPN Support Team
If you still cannot activate or sign in to your ExpressVPN account in Russia, contact the Support Team for immediate assistance.
Can’t connect to ExpressVPN in Russia
1. Update to the latest version of ExpressVPN
Please update to the latest version of ExpressVPN on your device. Find the latest versions to download.
2. Connect to these VPN locations in the following order
These VPN locations are most likely to offer a reliable connection in Russia.
Sweden
Netherlands - Rotterdam
UK - Docklands
Switzerland
Germany - Frankfurt - 1
If the above VPN locations do not work, you are recommended to keep retrying them, rather than use locations that are not listed.
3. Contact the ExpressVPN Support Team
If you still cannot connect to ExpressVPN in Russia, contact the Support Team for immediate assistance.